


【GA4対応】SWELLでGoogleアナリティクスを設定する方法|初心者向け基本的な使い方も


Googleアナリティクスの設定方法を教えてください。
初心者なので分かりやすい手順が知りたいです。
ブログを始めたらできるだけ早めに「Google アナリティクス」の設定をしましょう。
今回は、SWELLでGoogleアナリティクスを設定する方法を紹介します。
- Googleアナリティクスの簡単な説明
- Googleアナリティクスの設定手順(←SWELL利用者向き)
- Googleアナリティクスでやった方がいい初期設定
- Googleアナリティクス 初心者向け基本的な使い方
内容はSWELL利用者向きになっています。
SWELLなら、初心者でも簡単にGoogleアナリティクスの設定をすることができます。
ぜひ参考にしてみてくださいね。
Googleアナリティクスとは

Googleアナリティクスは、ブログを分析するツール。
- ブログに訪問してくれた人の数
- どこの国や地域などからブログを見ているか
- アクセスの多い記事はどれか
- どのデバイスで見ているか
- 男女比はどのくらいか
このようなことが分かり、ブログの改善やアクセスアップにつながる必須のツールです。
 ちあき
ちあきかなりの高品質なのに、誰でも無料で利用することができます。
SWELLでGoogleアナリティクスを設定する方法【GA4対応】

ここではGoogleアナリティクスを設定する手順を紹介していきます。
- Googleアカウントを作成する(←Googleアカウントがない場合)
- Googleアナリティクスのアカウントを作成する
- プラグイン「SEO SIMPLE PACK」をインストールする(←プラグインを導入していない場合)
- 「SEO SIMPLE PACK」にGoogleアナリティクスの「測定ID(G-〇〇)」を貼り付ける
SWELLではプラグイン「SEO SIMPLE PACK」に貼り付けるだけの作業になるので特に簡単です。
ちあき画面を見ながら一緒に進めてみてくださいね。
手順① Googleアカウントを作成する(←Googleアカウントがない場合)
Googleアナリティクスを利用するためには、Googleアカウントが必要です。
まだない人は、Googleのアカウントから作成しましょう。
ちあきアカウントがある人は手順②に進んでください。


もっと詳しい作成手順を知りたいひとはこちらのページを参考にしてください。

手順② Googleアナリティクスのアカウントを作成する
続いてGoogleアナリティクスのアカウントを作成します。

 ちあき
ちあきアカウント名(ブログ名)はなんでもOK! あとで変更できます。
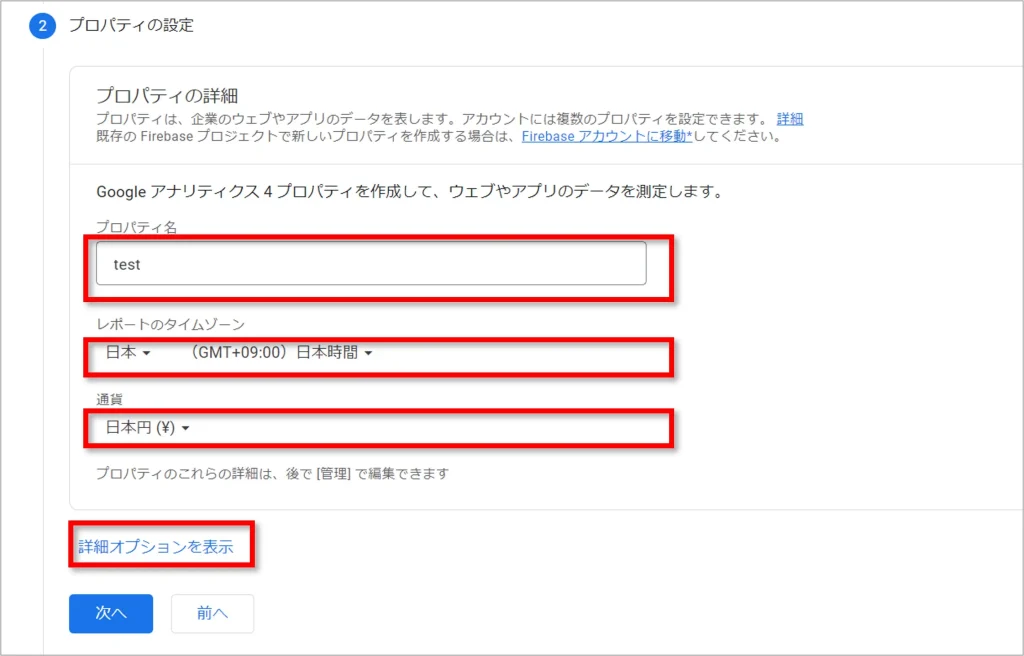
- プロパティ名を入力します
- 4文字以上の任意の英数字
- サイト名にしておくと分かりやすいと思います
- タイムゾーンを「日本」に変更します
- 通貨を「日本円」に変更します
- 「詳細オプション」をクリックします

- ユニバーサルアナリティクスのプロパティをオンにします
- ウェブサイトのURLに自分のブログのURLを入力します
- 「Google アナリティクス 4 とユニバーサル アナリティクスのプロパティを両方作成する」と「Google アナリティクス 4 プロパティの拡張計測機能を有効にする」にチェックを入れます
- 「次へ」をクリックします
 ちあき
ちあき「ビジネスの概要」は大体でOK!
自分に近いと思うものを選択してください。
- 業種:自身のブログに近いものを選択します
- ビジネスの規模:わたしは「小規模」を選択しました
- 利用目的:該当すると思うものを選択します
- 最後に「作成」をクリックします

 ちあき
ちあき以上でGoogleアナリティクスのアカウントが取得完了です。
画面は閉じずにWordPress画面へ移動してください。
手順③ プラグイン「SEO SIMPLE PACK」をインストールする(←プラグインを導入していない場合)
SWELLでは、アナリティクスのアクセス解析に必要な「測定ID(G-〇〇)」を、プラグイン「SEO SIMPLE PACK」に貼り付けるだけで設定が完了します。
まずは「SEO SIMPLE PACK」を導入しておきましょう。
ちあき「SEO SIMPLE PACK」を導入済みの場合は手順④に進んでください。


手順④ 「SEO SIMPLE PACK」に「測定ID(G-〇〇)」を貼り付ける
「SEO SIMPLE PACK」に、Googleアナリティクスの「測定ID(G-〇〇)」を貼り付けます。

最後に「設定補保存する」をクリックしましょう!
 ちあき
ちあきもしも「測定ID(G-〇〇)」のコピーをし忘れた場合は、Googleアナリティクスの「管理」→「データストリーム」からも開けます。
「 “Tracking ID” for UA」は2023年7月から測定不可になるので不要です。
Googleアナリティクスでやった方がいい初期設定 ⇒ 自分のIPは除外しておこう

SWELLでGoogleアナリティクスの設定が完了したら、初期設定として、自分のIPアドレスを除外しておきましょう!

自分のIPアドレスを除外するってどういうこと?
なぜ「自分のIPアドレスを除外する」のかというと、自分で自分のブログをチェックした際に、ユーザー数にカウントさせないためです。
ちあき特に、自宅での作業が多い人は設定しておいた方がいいです。
設定は次の手順で行います。


- ルール名:自分が分かりやすい名前にします
- マッチタイプ:「IPアドレスが次と等しい」にします
- IPアドレス:自分のIPアドレスを調べて入力します
- 自分のIPアドレスがわからない場合は「IPアドレスを確認」で調べられます
- 最後に「作成」をクリックします
 ちあき
ちあきこれで設定は完了です。自分のIPが除外されました。
Googleアナリティクス 初心者向け基本的な使い方

設定が完了したら、Googleアナリティクスの基本的な使い方だけ知っておきましょう。
とりあえず4つの基本的な使い方だけ知っておけばOKです!
- 「リアルタイム」
- 「ユーザー属性」⇒「概要」
- 「集客」⇒「概要」
- 「エンゲージメント」⇒「概要」
「リアルタイム」
「レポート」⇒「リアルタイム」
現在どれだけのユーザーがブログにアクセスしているか確認することができます。

- 過去30分以内にアクセスしたユーザー数と、何のデバイスで閲覧していたのかを確認できます
- どこから訪問したのかが確認できます
- どんなユーザーが訪問しているのかが確認できます
- 訪問したユーザーがどのページを見ているかが確認できます
- 訪問したユーザーがどんな行動をしたかが確認できます
「ユーザー属性」⇒「概要」
「レポート」⇒「ユーザー属性」⇒「概要」
「性別」や「年齢」、「国」や「住んでいる町」など、どんなユーザーがブログを見てくれているのかを知ることができます。

「集客」⇒「概要」
「レポート」⇒「集客」⇒「概要」
ユーザーがどこからブログを見に来たか、流入元を知ることができます。

| Organic Seach | Googleなど検索結果からの訪問 |
| Direct | ブックマーク、お気に入りなどからの訪問 |
| referral | 個人ブログやWebサイトなど、他のサイトリンクからの訪問 |
| Organic Social | ツイッターやインスタなどSNSからの訪問 |
| Organic Video | YouTubeなど動画経由からの訪問 |
「エンゲージメント」⇒「概要」
「レポート」⇒「エンゲージメント」⇒「概要」
ブログのPV数(ページビュー数)やユーザーの滞在した時間を調べることができます。
 ちあき
ちあきほかにも色々調べることはできますが、とりあえずこの4つの使い方を知っていればOKです!
ブログの運営に慣れてきたらGoogleアナリティクスを設定しよう

SWELLでGoogleアナリティクスを設定する方法を紹介してきました。
Googleアナリティクスは絶対に設定した方がいいですが、ブログ開設直後に急いで設定する必要はありません。
ブログは記事を書くこと優先なので、運営に慣れてきてからの導入で大丈夫です!
ただし、必ず導入はしましょう!
ちあきテーマにSWELLを利用して入れば初心者でも導入が簡単ですよ!
